


£ 23.99

Sponsored links
|
|
£ 23.99 |
To Shop
|

|
£ 63.84 |
To Shop
|
| COMPARE ALL WEBSHOPS (2) | ||
 Description
Compare webshops (2)
Sponsored links · Some shops pay us a fee
£ 23.99
£ 63.84
Shops with other sizes
Description
(1)
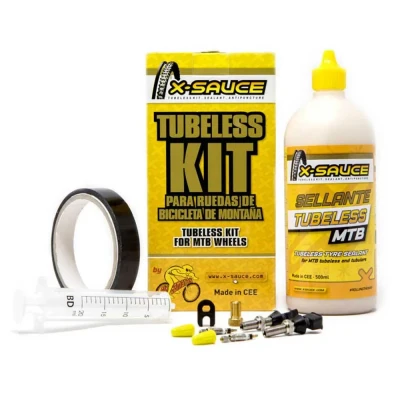
X-sauce Presta Tubeless Kit Yellow 23 mm. Upgrade your wheels with the X-SAUCE Presta tubeless kit, one of the lightest on the market at only 35g per wheel! This comprehensive set provides everything for a seamless conversion: valves, rim strips, tape, and ammonia-free sealant with an injector. Its standout feature is the independent valve and tape design, enabling hassle-free on-road repairs—just remove the valve and pop in a tube without touching the tape. Available for 26", 27.5", and 29" wheels (for rims up to 3cm high). Enjoy a lighter, more reliable ride and leave punctures behind. Customers consistently praise this tubeless conversion kit for its exceptional quality and ease of use. The highly effective sealant and durable components ensure reliable performance, preventing air leaks and successfully converting various tire types, even challenging ones. Users highlight the complete nature of the kit, including sufficient high-quality liquid and adaptable tape, making installation straightforward and yielding excellent results for a seamless tubeless setup. The Lightest Tubeless Kit! (with Plastic Bottom + Adhesive Tape) only 35 Grams Per Wheel (tapes + Valve)As the valve and the rim strip are independent, in case of an on road repair, it is not necessary to remove the tape, only take out the valve and put on the inner tube.- INCLUDES: 2 Presta valves or Schrader detachable tubeless compatible valves, 2 rim strips, adhesive tape, bottle of new ammonia-free sealant, injector for exact dose extraction, needle to inject, Schrader valve adaptor (in Presta valve kits) and instructions.For up to 3 cm high rims (if your rim is higher the valve cannot be tightened).Options:- For 26´´ Wheels With Presta Valve Or Schrader Valve And 20, 23, 25 And 27mm Rim Strip Width.- For 27,5´´ Wheels With Presta Valve Or Schrader Valve And 20, 23, 25 And 27mm Rim Strip Width.- For 29´´ Wheels With Presta Valve Or Schrader Valve And 20, 23 And 25 Mm Rim Strip Width.- Step 1: Instructions For The Election Of The Correct Rim BottomThe rim bottom should look like this:- To choose the width of the tire rim of the right kit for your tire you can do it by measuring the width of the tire from the outside.- To choose the width of the tire bottom of the right kit for your tire, it is best to disassemble your wheel, remove and measure the tire´s rim, provided it covers the bottom of the tire´s throat well. You must measure it on a flat surface, because if you do it on the rim itself, being concave, the data will not be correct. If your wheel does not have a rim bottom, cut a piece of paper of the width that you think fits and overlap it on the rim, adapting it to its concavity, so you will check whether it is correct or if you need a little more or less than a millimeter in width.- A second option is to measure the lower width of the rim, adding one or two millimeters to compensate for the concavity.Another option is to do it by measuring the width of the tire from outside and approximately:- For rims from 20 to 24 mm wide kit with rim bottom 20 mm wide- For rims from 25 to 28 mm wide kit with 23 mm wide rim bottom- For rims 29 to 35 mm wide kit with rim bottom 25 mm wide- For rims over 35 mm wide kit with rim bottom 27 mm wide- Step 2: Instructions For Assembling The Tubeless KitImportant Note:- We strongly recommend using Tubeless or Tubeless Ready tires for this kit to ensure ease of installation. With Tubeless tires a hand pump may be used for the final inflation step. - Inner tube type tires on the other hand, although most can also be used, require use of an air compressor for inflation and generally more mechanical ability because repeated inflations may be necessary immediately after introduction of X-SAUCE sealant in the tire to achieve correct sealing.Preparation of the rim: - Remove the rim strip or tape that might previously be on the rim a nd clean the rim thoroughly (photo 1). To do this you should use a rag with a household dissolvent (never alcohol, paint thinner, turpentine or other cleaners) and remove all traces of dirt left on the inside of the rim. Leaving any dirt on the rim will cause problems of tape adhesion. Also check the rim in search of cuts or sharp edges and use sand paper to file the rough edges over in order to avoid future cuts in the rim strip.- To cover the spoke´s holes use first the double-sided adhesive tape (photo - Apply the tape, starting anywhere on the rim, slowly and carefully to avoid it being twisted and making sure it is well centered (photo 3). Tape over the entire length of the rim until it overlaps itself for 3-4 cms (photos 4 and 5) previously lifting the protective cover of the tape that will be overlapped underneath. Before removing the top adhesive protector completely, press down firmly so it´s perfectly stuck to the rim and no air bubbles are trapped underneath (photo 6). For the moment the tape will cover the valve whole in the rim. Now remove the protective adhesive cover of the double-sided tape.- Next take the tire valve, and push it through the rim hole piercing the double-sided tape (photo 7). Remove the valve. Now take the nylon rim tape provided in the kit. Please note that it has a rough side and a smooth side. Place the rough side down so this side is in contact with the double-sided tape. Align the valve hole in the rim tape with the hole in the rim. With the tape now placed in this position reinsert the valve (photo 8) with the correct rubber washer according to the hole size and valve used (see supplemental information regarding which washer to use in step 3).- IMPORTANT:The rim tape sits very tight on the rim and will need to be levered on like you would a tire but it is precisely this tension that makes it long lasting and protects the seal on the rim. It is ok to stretch it as you go to get it onto the rim. When about ¼ of the tape is left to place you can use tire levers or just stretch it on by pulling holding the rim on the ground with your feet and placing the tape with both hands. Be sure to place now a screwdriver or similar tool under the tape before it is stuck onto the rim. Now center the tape and make it completely flat if it got twisted levering it onto the rim by using the screwdriver sliding it back and forth all around the rim to obtain the position seen in (photo 9). Finally, with a rag take a moment to push the rim tape firmly onto the double-sided tape (photo 10). Finally apply the nut to the valve and tighten by hand to hold it into place (photo 11).- Valve types and rims: - Presta valve: For rims with Shraeder/moto sized valve hole use the cone shaped valve C provided in the kit. For rims with the small Presta size valve hole. In this case do not use the cone washer and use the rubber washer D provided.- The kit comes with an adapter for inflating Presta valves with pumps with Shraeder pumphead and a key (B) for removing the valve core.Shraeder valve:- Only compatible with rims with Shraeder sized valve holes. No extra washers are required than the one that comes mounted on the valve. The Shraeder valve kit also comes with a silver cap that is used for removing the valve core and a protective yellow cap.Mounting the tire: - Spray or wet the tire inner sidewalls and the wheel rim with water (and only water, no soap). This is very important and will greatly facilitate the sealing process of the tire to the rim. Now mount the tire normally making sure both sides of the tire are within the rim (photo 13).Introduction of X-SAUCE sealant liquid: - The liquid from the bottle is ready to be introduced inside the wheel. Shake the bottle well before using it. Cut the tip off of the spout and pour the sealant carefully into the tire directly through the valve without the valve core (photo 14). The recommended dose per wheel is 60ml (2oz) however you can add a little more to extend the time until the next fill up (adds slight additional weight) or put in less and refresh with sealant more frequently.- Pumping up: For this step it is best you use a commercial air compressor or one such as available at your local gas station. Note: with Tubeless tires and Tubeless rims there is a possibility that pumping up could be done with a foot pump. You can try it before using an air compressor. - Using some kind of protective goggles during pumping up is recommended as some sealant may escape out of the tire at high pressure. - After the sealant has been introduced turn the wheel a few times, this allows the sealant to begin to circulate around the inside and then stop it so the valve is situated at the top of the rim. Now pump up the tire. For the moment 3bar (45 psi) of pressure is enough to properly settle the tire (please see GENERAL REQUIREMENTS AND RECOMMENDATIONSbelow for more details on tire pressures). It is normal that the tire makes some loud ´popping´ sounds. - This is fine and proof the tire is correctly seated on the rim.- Immediately after inflation turn the wheel and shake it in all directions for a couple of minutes to allow the sealant to cover all parts on the inside like the rim and tire bead to improve sealing. This operation must be repeated, turning the wheel a little each time, so that the liquid reaches the perimeter of the sidewall completely. Once the wheel is inflated check again the valve nut and tighten it by hand a little more if necessary. We do not recommend removing any air pressure in the tire at this time. It is advisable now to roll a bit with the bike, especially if the tire was the conventional inner tube type. This will help distribute and settle the sealant in the wheel sealing any holes it may have. When you mount the wheel for the first time refill sealant with a little more, for example after one month, especially if the tire is not Tubeless. Inflate the tire, take out the valve core and introduce and 20ml through the valve. Replace core and inflate normally (see step 7).- If your wheel loses some pressure during the first hours...
 Product specifications
| Brand | X-Sauce |
|---|---|
| EAN |
|
| Color |
|
| Size |
|
| Gender |
|
| MPN |
|
 Price History
Prices were last updated on:
 Related results


